HOW TO MAKE A 3FT. MINI RAMP
This mini ramp is 3ft. tall (from the ground to the top of the deck), 8ft. wide and 24'-0 from end to end (including each deck).
As with all structures here on DIYskate, you can build this mini ramp any size you want. However, for the material list to be accurate, you will need to follow the plans as listed below.
Keep in mind that this ramps measurements were not chosen at random. I spent weeks engineering a ramp that would be cost and material efficient, fun to ride and most important, sturdy and safe.
WHERE TO GET SUPPLIES
The wood and hardware can be found at most home improvement stores. Sometimes you can find the steel there as well, I know my local Home Depot carries the coping and threshold material.
If not, you can search the internet for steel fabricators or salvage steel. Personally, I've begun buying my steel from MetalsDepot.com because of their very quick shipping and good prices. I'm not affiliated with them in any way, I just like them and their product.
If this ramp is going to stay outside, it needs to be protected from the elements. A good place to start is with pressure treated lumber, paint and a tarp. You may want to invest in a composite material for the surface too. Such as Skate Lite or Ramp Armor.
Be extra careful when working with treated lumber though, the chemicals used to treat the wood contain a poisonous pesticide.
Materials needed
- 53 - 2x4's, 8' long
- 4 - 4x8, 3/4" plywood
- 10 - 4x8, 3/8" plywood
- 5 - 4x8, 1/4" masonite
- 1 - 2 3/8" x 16' steel pipe
- 1 - 25lb Box, 1 5/8" screws
- 1 - 25lb Box, 2 1/2" screws
- 8 - clothesline bolts
Tools needed
- Tape Measure & Pencil
- Hammer and clamps
- Combination square
- Drill w/ Drill Bits
- Circular & jig saw
- Chalk Line
- Friend
Approximate Cost: $500
Easy | | | | | Difficult
CHOOSING A LOCATION FOR YOUR MINI RAMP
Ideally, a level driveway or concrete pad would be the best spot for your mini ramp. But ramps tend to get pretty big and backyards and fields end up being the only place large enough for them.
If you're placing your mini ramp on terra firma (earth) you'll need to make footings, or pads that the half pipe will sit on. You can do this similar to the way you build a deck for a house, with concrete blocks.
I've written a separate page on ramp foundations, because it's more than can be covered in a paragraph.
BUILD IT
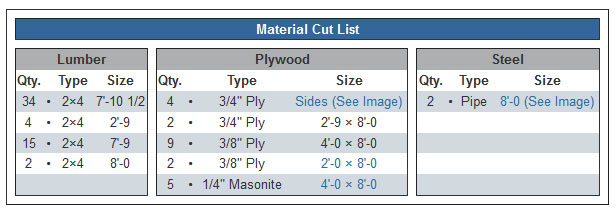
Below is a cut list referencing what you will need and it's size.
TRANSITION LAYOUT DIAGRAM
Gather two sheets of 3/4" plywood for the side templates. One sheet of 3/4" ply will provide two sides.
Use CDX or better grade plywood. Particle board is not acceptable for any skate structure, period.
CUT THE TRANSITION
With a jig saw, very carefully cut on the lines you drew for the transition. Once cut, you can use this as your template to trace the three remaining transition sides.
You'll only need two 3/4" sides for each 8' ramp section. Most ramps are made in 4' sections but this ramp is small enough to get away with an 8' span. Cut the templates and set them aside.
DRAWING THE TRANSITION
Take an 8' long 2x4 and on one end, drill a hole the diameter of a pencil (about 3/8"). Then measure from the hole you just drilled, the length of the transition radius. In this case, 6'-0. Place a screw there but don't go all the way through the 2x4 yet.

Take your 3/4" plywood and lay it on a fairly level surface. Grab another sheet of plywood and place it next to the 3/4" plywood as shown below.
With the 2x4 you made earlier, screw the screw into the top piece of plywood where shown above. Now you want to draw a radius using the 2x4 to guide your pencil until you have the transition radius clearly visible on the 3/4" sheet of plywood.
Once drawn, measure up 2'-11 1/4 from the bottom left side. Using a straight edge, mark this and the notch for the coping to complete the transition. The notch for the coping is 1 1/4" by 1 3/4".
FRAMING THE TRANSITION
Gather thirty four, 7'-10 1/2 long 2x4's for the transition sections. Each 8' wide transition section requires seventeen 2x4's. This includes the deck portion as well.
Take five of those 7'-10 1/2 long 2x4's and start framing this section by placing two 2x4's at the back, one at the front and two on the top next to the coping notch as shown above.
ADDING SUPPORTS
Place two 2'-9 long 2x4's under the deck 2x4's where shown below. Use about eight, 1 5/8" screws to attach each one.
These add extra support for the deck and need to be placed on each side in both transition sections.
FRAMING THE TRANSITION CONTINUED
Now attach twelve 7'-10 1/2 long 2x4's, 8" on center unless noted otherwise as shown below. Once this has been done, repeat the process for the second transition section and set them aside for now.
The 2x4's that are doubled in the lower portion of the riding surface are necessary to create a larger surface area for the seam of the first 3/8" plywood layer to.

FRAMING THE FLAT BOTTOM
Gather fifteen 7'-9 long 2x4's for the flat bottom supports. You'll also need two, 8' long 2x4's for the sides of the flat bottom section.
Attach the 7'-9 long 2x4's to the 8' long 2x4's, 8" on center as shown below to finish the flat section.
Pre drill the screw locations at the ends of the 2x4 with a 3/16" drill bit to keep the wood from splitting.
Also, as with the transition, the 2x4's must be doubled where shown for the first layer of 3/8" plywood.
PLACING THE RAMP
Now that all of the framing is done, the sections can be attached to one another. Hopefully you have the ramps final location all squared away too. If not you can learn more about ramp foundations here.
Start by having a friend help you move one transition section into place. Then place the flat bottom section next to the transition. Finally, place the last transition section next to the flat bottom section.
Once all of the sections are in place, make sure that they are level and fit together properly. Then double check that they are fitting together correctly. After you have done this, clamp the sections together to make sure they aren't going anywhere. I use quick clamps, but most any clamps will work.
ASSEMBLING THE RAMP
If your mini ramp is on a concrete slab, you can attach the transition and flat bottom sections together using 2 1/2" screws. Screw them together from each side of the bottom with about six screws per side.
If you are placing your ramp on footings or concrete blocks, drill four equally spaced 5/8" holes. Now bolt the sections together using four 1/2" bolts with nuts and washers per side, as shown below.

BUYING THE COPING
 To find the steel, look up "steel yards", "structural steel" or "steel fabricators" and so on in the phone book.
The actual size of the steel pipe that you are looking for is 2 3/8" (60.33mm) outside diameter. With a wall thickness of 7/32". This pipe is known by steel shops as...
2" OD, Schedule 80, black steel pipe
Some steel shops are picky about what it's called so use the above name if they seem confused.
You can also use schedule 40 steel pipe (5/32" wall) as it is cheaper and lighter, but it may become dented. Schedule 80 pipe on the other hand will not dent under normal skateboarding use.
Do not use PVC pipe (plastic) or electrical conduit, if you want it to last.
CUTTING AND DRILLING THE COPING
 Cut your steel pipe into two pieces at 8' long with a steel cutting blade (carbide blade) and miter saw or circular saw.
Now we need to attach the steel coping to the ramp. I am going to cover two of the most common methods.
The first method being screws. If done properly, screws will hold the coping secure for the life of your ramp. Also, you will rarely if ever notice the holes while skating the ramp.
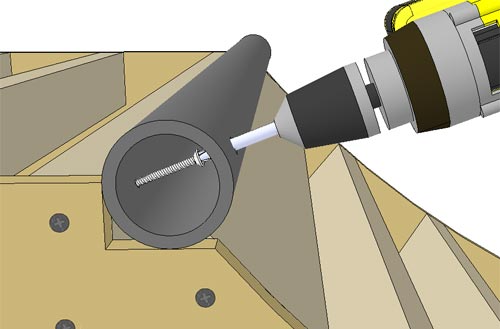
Start by marking the pipe about 3" in from the ends and then about every two feet in between. Now drill a 3/8" on the outside and a 3/16" hole on the inside of the pipe.
ATTACH THE COPING W/ SCREWS
Once drilled, place the coping in the notch on the mini ramp. Rotate the pipe so that the screws will hit the 2x4 close to the center. Now place the screws in the holes and screw the pipe down snug.
After you're done, go back with a screwdriver and make sure the screws are screwed down tight.
ATTACH THE COPING W/ BOLTS
 To attach the coping to the mini ramp with bolts, you will need to drill holes in the 2x4 behind where the coping will sit. Mark the 2x4 about an 1 1/2" down from the top, 6" in from each end. Also mark two in the middle at 2'-4 apart. Drill a 3/8" hole in each marked location at a slight downward angle.
Once the 2x4 has been drilled, place the coping in the notch on the mini ramp. Use the previously drilled holes to mark the coping. Remove the coping and drill the 3/8" holes where you have just indicated.
Feed a hook bolt into the holes you drilled and place the coping in the notch on the mini ramp, while lining up the bolts with the holes in the 2x4. Tighten the bolts down secure to the 2x4 using nuts and washers.
The bolt at the bottom of the illustration on the right is also known as a clothesline hook and is the most common for this application. However, hook bolts come in a variety a shapes and sizes. You can use almost any of them as long as they are about 3" in length and have a 3/8" diameter.
COVERING THE DECKS
Now that you have the coping all taken care of, it's time to cover your ramp. Start with the decks.
Cut two sheets of 3/4" plywood down to 2'-9 wide. Attach a sheet to each deck portion of the ramp with 1 5/8" screws. Space the screws about a foot apart from each other on the studs below.
You must hit the 2x4 supports with the screws. A good way to accomplish this is with a chalkline or straight edge and pencil. Use the screws on the sides of the ramp as guides for the 2x4 supports.
SECOND LAYER OF PLYWOOD
On the second layer, you don't want the plywood seams to be in the same place as the bottom layer. So cut a sheet of 3/8" plywood in half and attach it to the ramp the same way as the others.
Keep adding full sheets until you reach the other side and the coping. Cut the last ply to fit if necessary.
COVERING THE RAMP
Place a sheet of 3/8" plywood on the ramp. Push it flush against the coping and begin attaching the ply with 1 5/8" screws. Start at the top and work your way down, going from left to right like reading a book. You may need someone to help you hold the ply in place while you get the first few screws started.
As with the deck, mark the location of the 2x4 supports and space the screws about a foot apart.
Next, take another sheet of 3/8" plywood, push it flush against the previous sheet and attach it in the same way placing the screws about a foot apart.
Once you've attached the first two pieces, do the same to the other side of the ramp leaving the center exposed as shown above.
The idea is, you shouldn't have to cut the center sheet for it to fit. The space should work out to four feet. But if you do have to cut the sheet, it's much easier to figure it out here than on the transition.
ATTACHING THE FINAL LAYER
Start with a full sheet of masonite and press it flush against the coping just like the first layer. Keep adding sheets until you reach the other side. Once again, cut the last one to fit if necessary.
The coping should stick out 3/8" from riding surface. If it sticks out too much, place wood shims under the masonite, near the coping to raise the masonite. Shims are available at your local hardware store.
The main difference with masonite is that you need to countersink the screw hole locations before you screw the masonite down. You can do this with a countersink bit, or a 3/8" drill bit and a steady hand.
You also will need to space the masonite sheets about 1/16" to 1/8" from each other. This keeps them from bubbling up when they expand due to temperature change. I use pennies to space them.
FINISHED 3FT MINI RAMP
Make sure you go over the entire ramp prior to skating it. The last thing you want is to take a slide and there be a screw still sticking out.
But if you've made it this far, you're the proud owner of a brand new 3' mini ramp. Congratulations on your new mini ramp. Enjoy!
EMAILS I'VE RECIEVED FROM READERS...
Dave & Son
"Just finished building the 3' mini ramp with my 13 year old son. We live in southern New Jersey.
I wanted to tell you that your plans and instructions are spot on. I appreciate the time you took to put this out there for people like us. It took about 3 full days to finish and ended up costing us $800. We used pressure treated wood and needed several bags of stone to level the area we wanted to put it.
What a great experience for the two of us to do this project together!
-Dave"
Thanks Dave, I appreciate the feedback. Glad the plans worked out for you and your son.
Thanks again, Jason
FRANS @ HIMMEE CREATIVE MULTIMEDIA
These guys from Finland decided to put a mini ramp in their office. I don't see why not, hahaha
Thanks guys, enjoy your ramp!