HOW TO MAKE A LAUNCH RAMP
I remember almost killing myself on one of these when I was about 16. Now don't let my stupidity keep you from learning how to make a launch ramp. Launch ramps are too fun to pass up.
For those who don't know, launch ramps are quarter pipes without a deck or coping and you use them to "launch" you. They're also good for a make shift wall ride behind your local supermarket.
Regardless, this launch ramp is 6' long x 2'-6 wide x 2'-6 tall.
As with all structures here on DIYskate, you can build this launch ramp any size you want. However, for the material list to be accurate you will need to follow the plans as listed below.
WHERE TO GET SUPPLIES
The wood and hardware can be found at most home improvement stores. Sometimes you can find the steel there as well, I know my local Home Depot carries the coping and threshold material.
If not, you can search the internet for steel fabricators or salvage steel. Personally, I've begun buying my steel from MetalsDepot.com because of their very quick shipping and good prices. I'm not affiliated with them in any way, I just like them and their product.
If this ramp is going to stay outside, it needs to be protected from the elements. A good place to start is with pressure treated lumber, paint and a tarp. You may want to invest in a composite material for the surface too. Such as Skate Lite or Ramp Armor.
Be extra careful when working with treated lumber though, the chemicals used to treat the wood contain a poisonous pesticide.
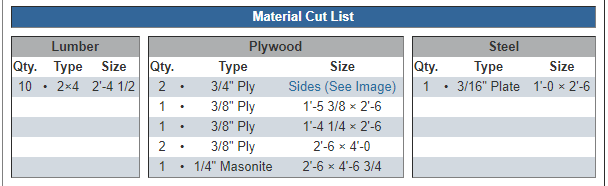
LUMBER CUT LIST
Start by cutting ten 2x4's to 2'-4 1/2. You should get three out of each 8' long 2x4. Set them aside. Below is a cut list referencing what else you will need and it's size.
3/4" PLYWOOD CUTTING DIAGRAM
Using a 2x4 with a screw and pencil as your compass, clearly draw the radius on the 3/4" plywood.
.gif)
After the radius has been drawn, carefully cut along the line using a jigsaw.
Once cut, use this side as your template to draw and cut the other side. Both sides are identical.
BUILD IT
Start by attaching the bottom, top and front 2x4's to the sides with a couple of screws on each end.
It helps if you can get a friend to give you a hand here.
FRAMING THE SIDES
Now attach the remaining seven 2x4's spacing them 8" apart, on center except where noted below.
You will also want to double up the 2x4's as shown. This is where the 3/8" plywood seam will meet and the double 2x4's allow a larger surface area for attaching the two sheets.
3/8" PLYWOOD CUT LIST
Cut the 3/8" according to the cut list below. By following this cut list illustration and by making the launch ramp at 2'-6 in width allows you to get away with only one 3/8" sheet of plywood.
ATTACH THE PLYWOOD - BOTTOM LAYER
Take the 1'-4 1/4 x 2'-6 sheet of 3/8" and attach it to the framed launch, starting at the top. You want to screw from the top down placing a screw every 8" or so making sure you screw into the 2x4's.
Next, take the 4'-0 x 2'-6 sheet of 3/8" and push it flush against the previous 3/8" sheet to finish the bottom layer. Again screw from the top down, placing the screws about 8" apart.
ATTAHING THE PLYWOOD - MIDDLE LAYER & MASONITE
Next take the other 4'-0 x 2'-6 sheet of 3/8" plywood, and screw it in place starting at the top.
Then place the last 1'-5 3/8 x 2'-6 sheet of 3/8" using the same screw pattern as before.
Now lay a 2'-6 x 4'-6 3/4 sheet of masonite on top of the 3/8" ply surface. Unlike the 3/8", you'll need to countersink the masonite with a 3/8" drill bit or a countersink bit.
Then, just like the screws in the previous plys, you want to start at the top and work your way down.
FINISH AND SKATE IT
Last, attach the 1'-0 wide x 2'-6 x 3/16" thick sheet metal to the launch. Drill three, 3/16" evenly spaced holes then countersink the screw locations with a 3/8" drill bit.
After the holes are drilled, countersink each by using the 3/8" drill bit or countersink bit to ensure the screw heads are flush with the steel. You will need shorter screws here too, about 1 1/2" will do. Make certain you hit the 2x4's underneath as well.
That's it! That's how to make a launch ramp that's fun to skate and will last. Put on your Jimmy-Z shorts and your neon pink Quicksilver shirt and learn backside 360 early grabs! Good luck!