HOW TO MAKE A "WELDLESS" GRIND RAIL
Here's another way to make a grind rail without drilling or welding using the same method as the cinder block ledge... Liquid Nails.
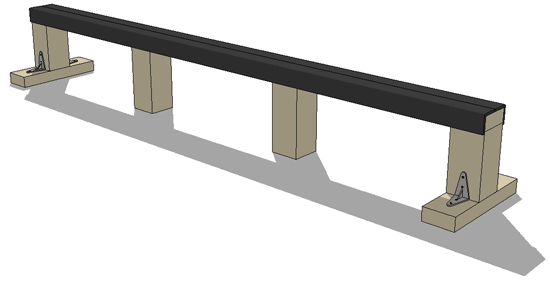
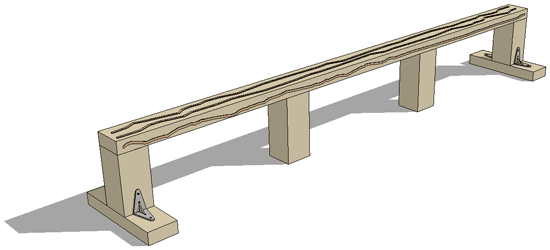
This rail is 10 inches tall by 6 feet long and uses a construction adhesive instead of drilling and screws or welding to attach it.
This is also a readers suggestion, based on a grind rail he found on You Tube. Thanks Ben.
WHERE TO GET SUPPLIES
The wood and hardware can be found at most home improvement stores. Sometimes you can find the steel there as well, I know my local Home Depot carries the coping and threshold material.
If not, you can search the internet for steel fabricators or salvage steel. Personally, I've begun buying my steel from MetalsDepot.com because of their very quick shipping and good prices. I'm not affiliated with them in any way, I just like them and their product.
If this ramp is going to stay outside, it needs to be protected from the elements. A good place to start is with pressure treated lumber, paint and a tarp. You may want to invest in a composite material for the surface too. Such as Skate Lite or Ramp Armor.
Be extra careful when working with treated lumber though, the chemicals used to treat the wood contain a poisonous pesticide.
Materials needed
- 1 - 2x4, 8' long
- 1 - 4x4, 8' long
- 1 - 1lb box of 1 5/8" screws
- 1 - 1lb box of 2 1/2" screws
- 4 - angle brackets
- 2 - 6 ft angle iron
- Liquid Nails Adhesive
Tools needed
- Tape Measure & Pencil
- Circular saw or Jig saw
- Drill w/ philips bit
- Applicator gun for adhesive
Approximate Cost: $75
Easy | | | | | Difficult
CUTTING THE LUMBER
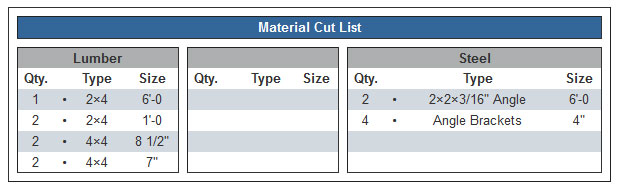
Gather your materials. Start with the 2x4. Cut it into three pieces, one at 6'-0 and two at 1'-0. Set them aside. Cut the 4x4 into four pieces, two at 8 1/2" and two at 7", these determine the height of the grind rail. Below is a cut list referencing these pieces.
ASSEMBLING THE LEGS
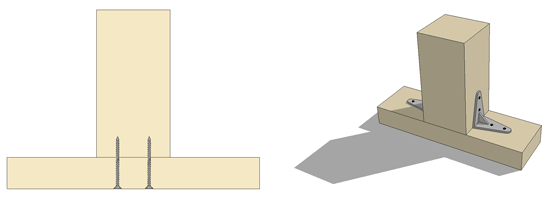
Take two of the 7" long 4x4's and attach a 1'-0 long 2x4 to the end of each using four or five of the 2 1/2" screws. Place a 4" angle bracket in the corner of each leg as shown above using the 1 5/8" screws.
The angle brackets keep the legs from pulling free of the 2x4 feet (they help stabilize the rail).
ASSEMBLING THE GRIND RAIL
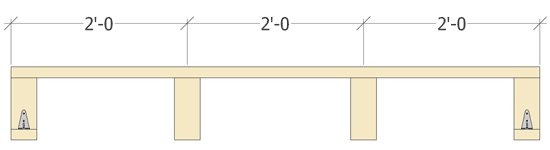
Now that the legs are complete, you can place the remaining 6'-0 long 2x'4; to the legs using four or five 2 1/2" screws in each leg. Then attach the last two 8" long 4x4 legs to the 2x4 at 2'-0 in from each end.
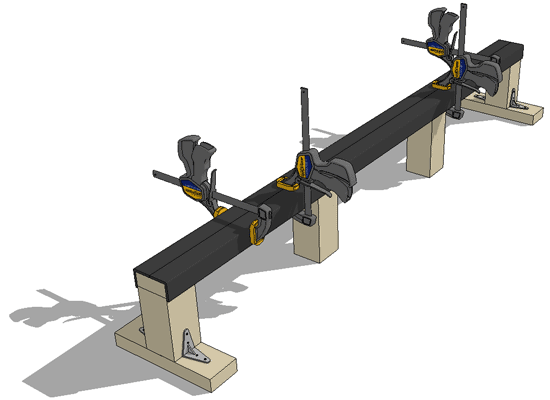
PLACING THE ADHESIVE
Take your construction adhesive, I prefer liquid nails, and run a bead down the top and side of the 2x4.
Liquid Nails also comes in a self dispense tube which would work great on something like this.
ATTACHING THE ANGLE IRON
Take each piece of 6'-0 long angle iron and place them on the grind rail. Use a couple clamps from the sides and top to hold the angle iron in place while the adhesive sets.
SKATE IT
Once the adhesive has dried (depending on the adhesive - about 12 hours or more), you can skate it.
This should be a quick, cheap and easy project that you and your friends can finish in a weekend. So what are you waiting for... there's nothing to it, but to do it! • Thanks again to Ben for the suggestion.